macs3n
342974
1545
65

Finished product first. This is 18K gold with a cushion cut green sapphire in a bezel setting.
When I started thinking about popping the question, I knew that I wanted to make the ring myself. I have some experience making things with my hands (mostly woodworking projects) but no experience with metalwork.
After a little googling I connected with Sam Abbay at http://www.newyorkweddingring.com/. He does 1 on 1 workshops where he guides you through the process of making a ring. We started talking in December, and I finished the ring in late February (though the big blocker was sourcing the stone!)
Doing this myself was really fun and meaningful for her. She loves that I made it myself (the first words out of her mouth were "did you make this?!")

However, the first order of business was sourcing a stone. I knew she had no interest in a traditional diamond, but would like a green or yellow square cushion cut stone. I first thought yellow Moissanite but they stopped selling square cushions. So then I somehow (I think from doing research on /r/jewelry) came across Montana sapphires and fell in love.
The most beautiful stones I found were all at Earth's Treasury, but none were quite right (I was targeting a 6-7mm square cushion, green to green-blue in color). But Jeff was able to find something for me after a couple of months of back and forth. This is the pic he emailed me a few minutes after cutting this stone.

Once I had the stone I met up with Sam at his workshop and we got started. Step 1 was carving the setting out of wax so we could send it out to be cast. The casting (and, I suppose, mining the gold and the stone and cutting the stone) are the only things I didn't do myself by hand.
To carve it, he had me chuck it into this rotary tool and use it like a tiny lathe, first making a cylinder and then shaping further.

Getting closer

Starting to square up the outsides. I had to leave the walls about 2mm thick so it wouldn't get screwed up during casting.

Starting to fit the stone

Did some melting of wax to make it fit exactly, then had to cut away a bit to free the stone.

And the finished bezel setting in wax. Super rough still. It took about 4.5 hours to get to this point. Sam sent this out to the casters after I left that night.

Next time I came in I started working on the band. I was aiming for a 5.5, so we looked up the right circumference for that size and cut the stock to length.
After cutting to length, both ends were flattened and made perfectly square to the sides so they can be joined together.

Missing step is annealing the stock with a propane torch. After annealing it was easy to bend with these special pliers (one inner surface is rounded, to avoid damaging the inner side of the band as you bend it).

Got the ends lined up perfectly.

Soldering the band together. If you look carefully, you can see that the seam is resting on a tiny little tent shape made of solder. When it gets hot enough, the solder melts, the band lowers into the little puddle, and capillary action pulls the solder into the joint.

After soldering the ends together, I put the band on the mandrel and gently hammered the non-round parts to even it out into a perfect circle. Then popped it in an acid bath to get rid of the black oxidization stuff.

Thinking about the profile for the band. I decided I wanted a very slight taper inward toward the stone.

I don't know what it's called, but he had a sort of roller press machine. You set the distance between the rollers, stick the ring part way in, and pull a lever that slowly pulls and presses on the band. This slightly flattened the upper part of the band as you can see.
I tried to center the solder line but was slightly off. This is the end of session two, another 4-5 hours.

By session 3 the setting was back from the casters. First step was doing a bunch of shaping of the outside (thinning, tapering) to get the shape I wanted. This had to be done first, because the next step is actually connecting the band and the bezel.
This was mostly done with a file but I might have used the rotary tool a bit.

We somehow miscalculated the band size originally and just had to re-cut on the solder line and stretch it a little so the setting could fit in. It actually ended up working perfectly.

This thing holds the band and the setting together under some tension so you can solder them together. This was the scary part. And just getting them perfectly aligned took like 10 minutes.

Boom! Came out great. Missing: a scary moment where the band expanded slightly while heating it up, causing everything to fall apart (thankfully before the solder melted). Had to pull everything apart, make the band gap narrower, and retry. But it worked on the second attempt.

Haven't done *anything* inside the setting yet - that's next.

But first a little filing to make the transition between band and setting seamless.

Cleaned up, shaped, ready to prep the inside of the setting.

Using a rotary tool with a super tiny burr to carve out the inside of the setting. There were two main parts to this: basically carving the shape of the stone straight down into the bezel so it could sit flush, and carving little relief channels for the points of the stone so it would be less likely to shatter when setting it.
All of this carving happened with the stone sitting in this cool vise thing, while looking through the microscope. It was a little too low for me so I had to have a very wide stance :)

For clarity: this is what I mean by cutting the shape of the stone straight down into the bezel. Doing this allowed the top of the stone to sit just below the top of the setting, while resting on the angles at the bottom.

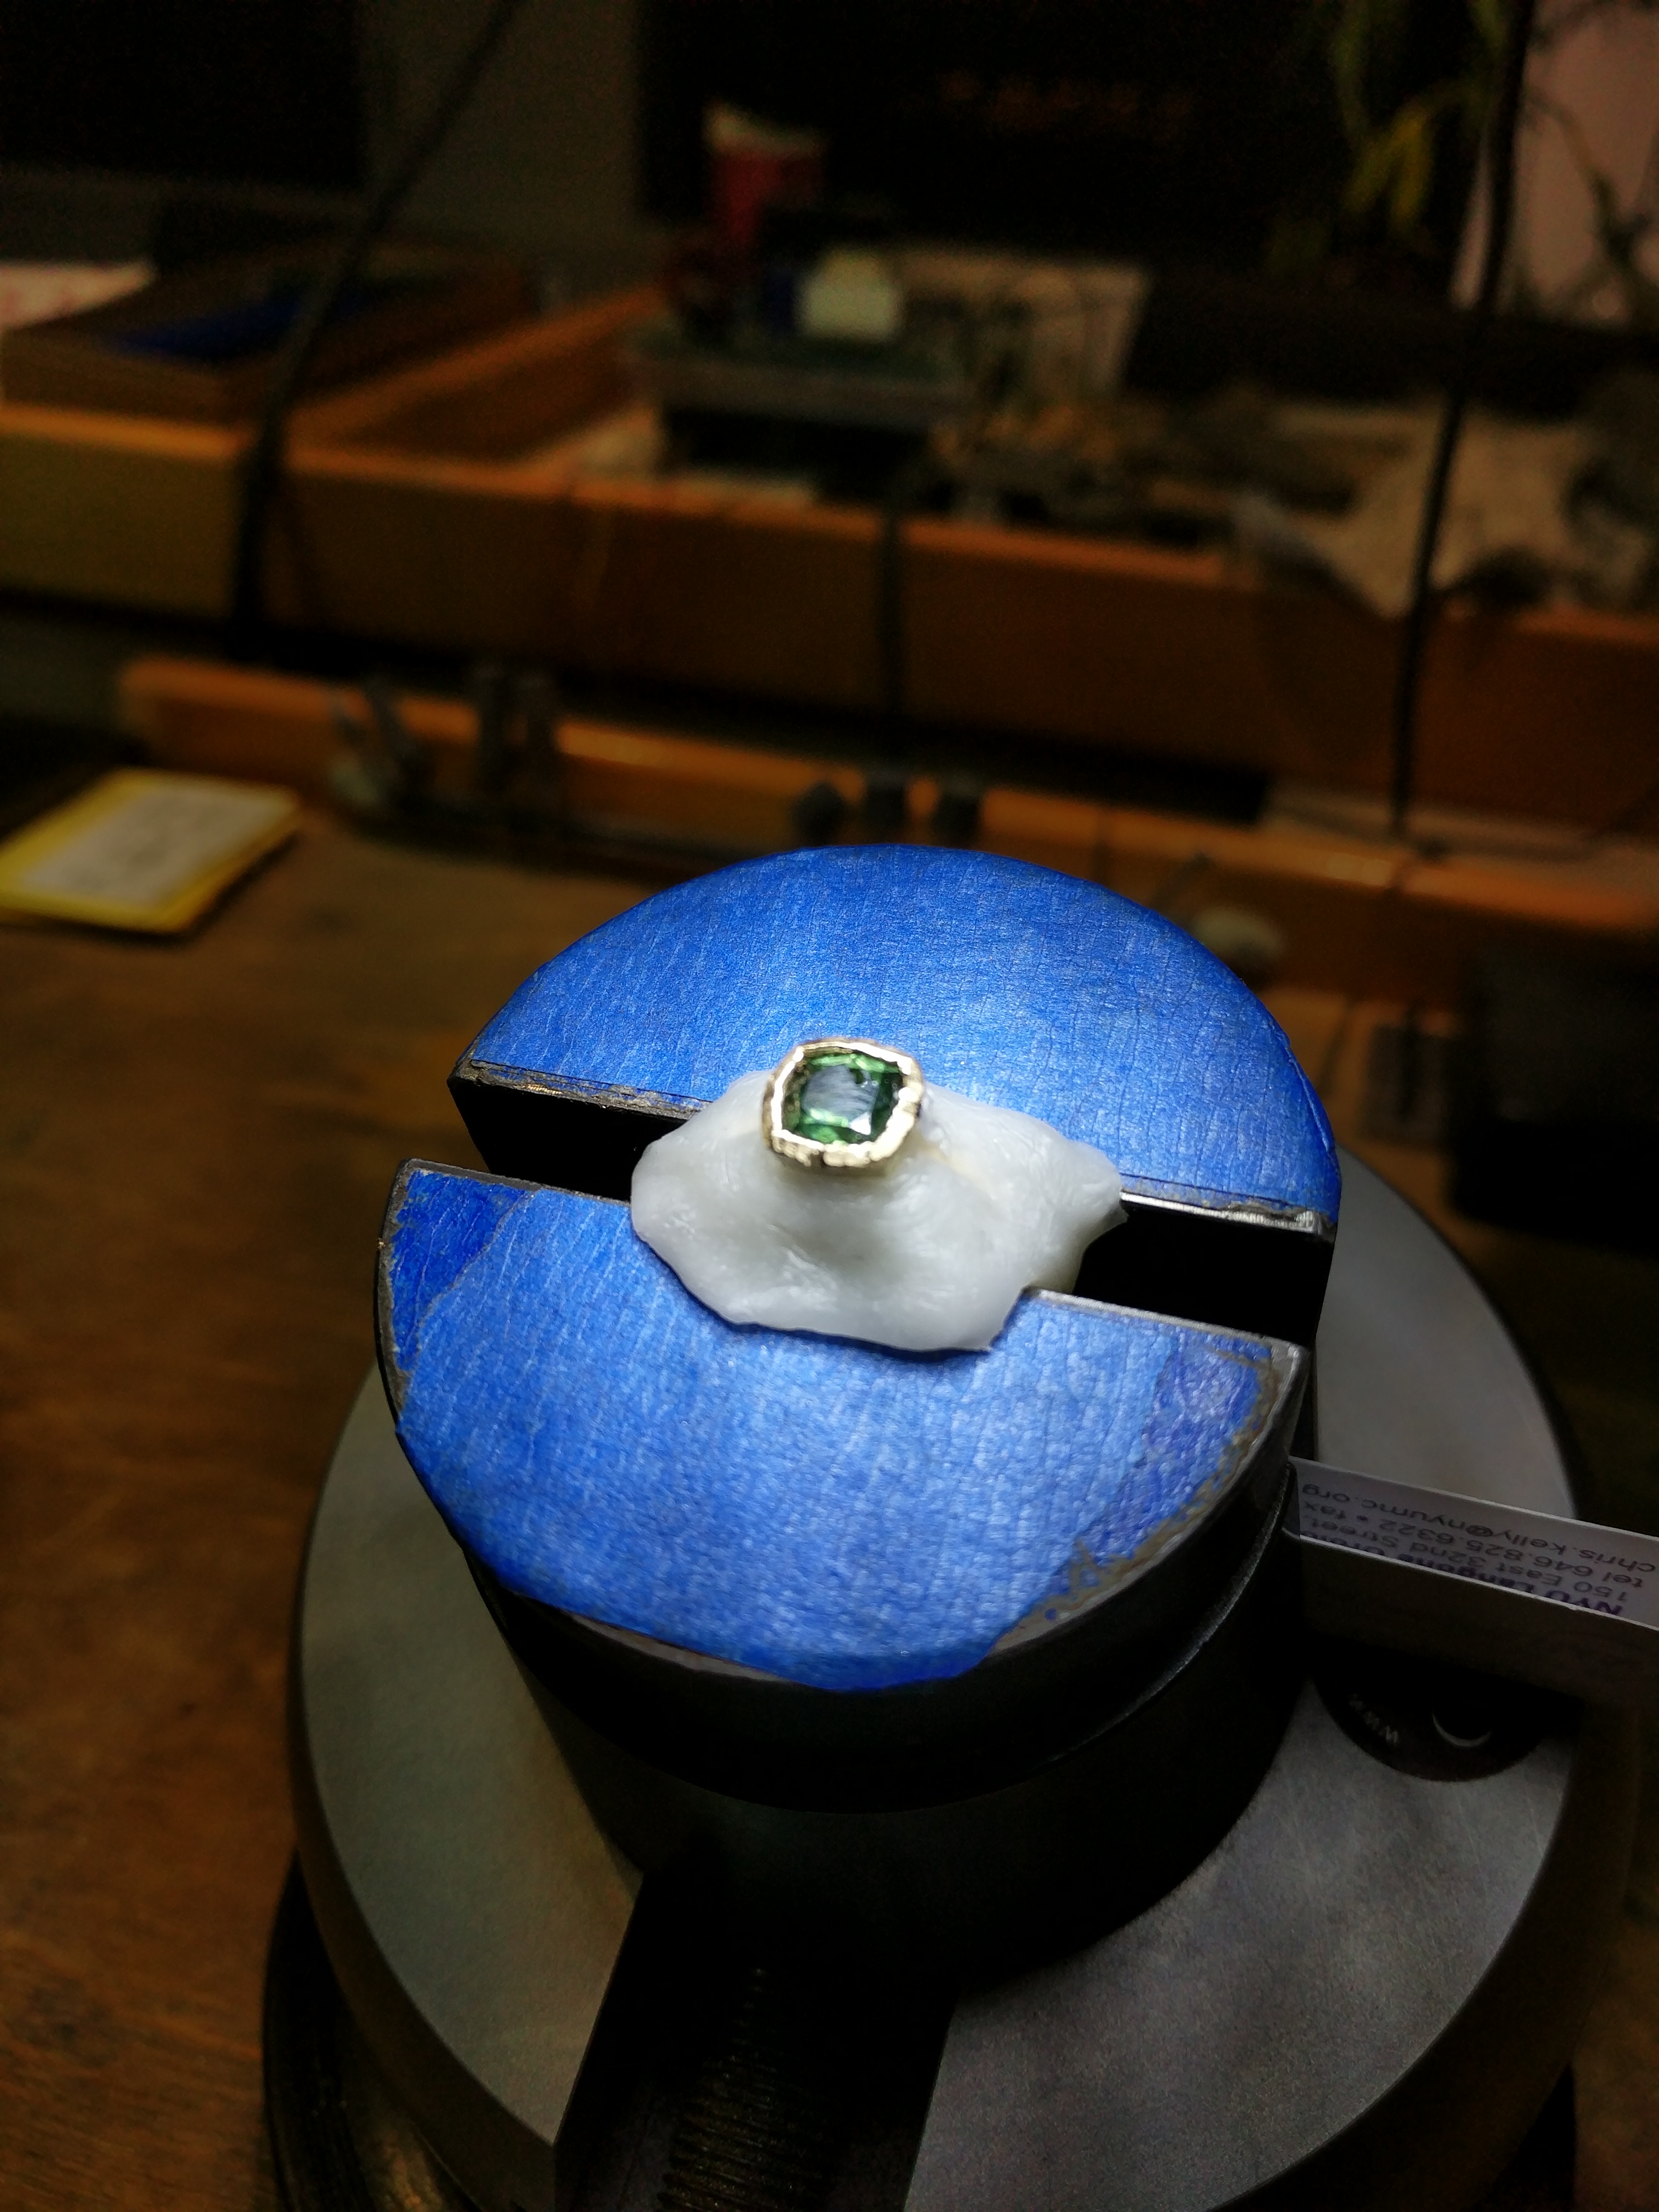
The view through the microscope. The blue is sharpie (easy to remove with alcohol) which let me always put the stone in with the same orientation as I did fit tests.

After getting everything to sit flush and firm, it's time to start setting. This also happens with the microscope. First, we put some moldable wax in hot water, then covered most of the ring. This prevents finished parts from getting scratched up while you're doing the setting.
Basically you're folding the metal over the edge of the stone. To start, I did light taps on each opposite face, just doing a little at a time. After that, just kept working one side at a time, tap tap tap. Had to spend some time thinning the walls so that they would bend without having to hit too hard.
At this point there is metal touching continuously all around the edge of the stone, holding it in very securely.

Starting to carve away excess metal (you can see some shiny parts on the inside edges of the bezel - carved away with a little chisel.
WORD OF WARNING: it's possible to chip your stone while doing this. I'm still not sure how I did it, but I very slightly chipped some of the crisp edges of the stone. If you look at the first pic you can see a slightly fuzzy edge in the top right quadrant of the stone.
I didn't notice until the very end and am still a little upset about it.

More carving and filing to clean up the edges of the setting. Starting to get somewhere.

Skip ahead an hour or so and IT'S DONE! Finished shaping the setting, took off the wax, did some final shaping and cleanup on the outside of the setting, and finished with very light sandpaper all over for that semi-matte finish.
All in this project took 20-25 hours of actual work time in the shop, and a bunch more outside the shop thinking and planning (and doing things like finding the stone).

Sneak peak of the box, which I also made. The build album for that is here: http://imgur.com/a/iY6Eh

She said yes!
I asked her at a winery in Sonoma on a beautiful day and had a hidden photographer to capture the moment. So we have some great pics of that but they're not for the internet :) Here's a pic later in our apartment.
The stone looks super different depending on the light. In very bright, direct light it's an incredibly brilliant green; in indirect light it's much darker, but has some deep fire; other times it looks more blue than anything else. So far she really likes it and it suits her perfectly.
bluej13
She's a lucky girl to have someone who cares enough to create something so unique.
EngagerRings
So beautiful! But there's an app for this ;) - check out engager-rings.com.
lenomdeplume
TIL sapphires can be Green.
Fumbledpersonality
You don't know the respect I have for you, for keeping the photos sentimental and not posting them online. +1
Tyggna
It's nice and all, but can you dominate all life on middle earth with it?
FantasmaFeliz
Person looking at the magnifier is hot as fuck
BetelgeuseTheStar
Thanks for the shout-out! This is the coolest thing I've had anyone do with one of my gems. Impressive work and what a great story.
HolyHellJezebel
I love bezel set rings because they don't get caught in my hair or on my clothes.
macs3n
yes, she loves that too! and even with a big stone it sits pretty low on the hand so you can reach in your pocket etc.
gabiinunderland
I know I'll never someone like this, so +1 to you for being a great boyfriend and she's a lucky gal. Good luck and best wishes!
aussieboily
Ur a bloody legend mate +1
SalaciousCrumbb
Anyone else get a strange tingle by all those specialty tools?
screamingshits
i'd wear it!
felixrefax
Saw this earlier while browsing, had a nap, dreamed, now I know where I had seen that "evil enchanted ring of time" before...Nice job btw :)
Piepersonsmom
You made the ring as well, crafty!
thisiswheremyusernamegoes
I'm from Bozeman, MT. Earths treasure does great work and MT yogo sapphires are awesome!
BuckDitkis
Hit me up if you want enchants. I have 100 skill and can slap 2 on there for ya. 46% inc archery and stealth in thinking.
AnAcuteCaseofLonliness
Fuck your happiness, asshole, and fuck you for being artistic
PNastyX
imgurians always making horcruxes..
Fungreenspring
Speechless
daveeeeeeed
That'd make a nice horcrux
EqualResponsibility
Im curious about the setting. Does the setting you used hold better? Im always afraid of my wifes stone falling out as its only 3/4 prong.
LoganDodson
Well, this tickled my LotR elf fetish. Forge MOAR!
Pollock007
This would have been cooler if your name was Jared
Alternalo
Congratulations on +30% cold resist.
redivider
LOLOLOLOL
FeralGh0ul
What a waste of a ring slot...
maxxra
I thought the title said "saphic engagement ring" and was all "yay lesbians!"
MarvaNipp
Wow that's awesome. The ring is beautiful! Side note: I think that's super classy to keep your engagement photos private.
Fumbledpersonality
I think your username is super classy
MarvaNipp
IOnlyUseHashtagsSarcastically
Bless you both. I just loled.
MorRobots
Why not us an existing dye struck setting and solder on the band/shank? Wax carved cushion cut bezel feels a lot of work.
macs3n
you sound like you know more than me about this, but IIUC it's tough to find an existing setting that fits a custom cut square cushion
theangrypunk
Good call. Bitches hate diamonds.
Mytittiesarekitties
I like sapphires :)
merp213
Emerald girl myself!
EqualResponsibility
Depends on the girl. You have a keeper if she knows exactly what she likes (like op gf) and doesn't care about flashy low quality diamonds.
EqualResponsibility
A 1 Ct. flawless diamond that isnt a blood diamond sets you back about $5000. Just the stone. So, compare that to what you see out there.
EqualResponsibility
To the OP, you'll not get to upgrade it and anything later if you wanted, as most engineers/builders do shes never going to take that off :)
TheMythicalJackalope
I love other stones but had to replace my sapphire engagement stone with a diamond because it scratched very easily. Lucky I had a (1/2)
TheMythicalJackalope
(2/2) family diamond I could use. That is he only downside to not-diamonds. Still have it in a necklace setting though cuz I love it
FireAndEarth
If you had a sapphire that scratched easily, it was you, not the sapphire. Or not a sapphire. Or you work with boric acid.
TheMythicalJackalope
It was real. Had it checked.
merp213
Same thing with emeralds. I have to take my ring off to do cleaning, showering, putting lotion on etc
psyquoz
Nice work - congrats. Can we get a step-by-step DIY project on how to get a girlfriend? Thanks.
zenmaster92
step1: go to the gym
SuspiciousCharacter
Step 2: realize you waited too long and your membership expired.
OmnipotentTurtle
Step 3: ????
gman1216
step 3: be good looking :)
waytoocreamy
Step 3: kill your self
SuspiciousCharacter
Step 4: Lern two spel
FeralGh0ul
sTEP 5; GET aA SILVER toungUE LIKE mE
razgris
The rolling thing is called a rollingmill, chipped stones are fairly common and bezels are more likely to chip them if you don't make the
razgris
Seat absolutely perfect to fit the stone
Topramen20
Does not have to be a perfect seat. As long as the stone is level. Also, 18k white is hard and brittle. Not the best for bezel set
Topramen20
Realized it's 18 yellow, which is amazing for bezels lol
razgris
Lol was gonna say, and yeah it does for colored stones, especially a rounded thin girdled cushion
razgris
Now that I look at the actual picture he chipped it on the facet junction on the crown, probably hit it with the graver or file
JewishMonk
Why didn't he melt the wax, pour it onto the sapphire, and then cut away the parts he doesn't need? Seems like that would get a perfect fit.
razgris
Stone* he looks like he had a good guy because he did everything properly for non Stone in casting, but probably just had some flashing or
razgris
Around the stone, and cast it with the stone in it you can do it with diamonds, sapphires, and rubies, but the wax that you use comes as a s
razgris
Solid block, you try not to melt it because you do not want bubbles in the cast or you end up with holes, so the wax gets carved for the sto
razgris
Generally when casting a mountain he did it proper, but he also could have cast stone in with that Sapphire, where you just build the wax ar
razgris
Mounting* text 2 speech fail
razgris
A burr or shaving, that put too much stress on one part of the Stone, or he hammered the channel 2 hard or hit the stone with the punch
JewishMonk
Okay, I think I get most of that. So if melting the wax entirely is risky, what's wrong with heating the wax up to soften it and then
JewishMonk
pushing the stone into the center?