acorntail
131625
3030
59

The finished product first; you can't see the TV in this picture, however. My D&D group reached the final dungeon in Curse of Strahd after two years and I wanted to do something special for the occasion. I was inspired to do this after our group spent four months in a dungeon getting lost because none of us could keep track of the environment and it took forever to navigate. A TV to display battlemaps seemed perfect to avoid the drain. I've always been interested in wood working, and my mother does props for theatre, so we had the tools to make a table.

Finished with the TV visible. The Mitre Saw was used to cut the wood, but lived outside most of the time to avoid spewing sawdust over my living room.

The first thing to do was find a TV for the battlemap. A quick scour of the local classifieds website and I found an old 42" TV going for $50 as it was being replaced and upgraded. It also came with some wall mounts, so I might have some fun figuring those out.

I followed the design and instructions to build the table from this video by GamingGeek on Youtube. His plans and detailed walkthrough was super helpful.

... However, his design was in Imperial Measurements, and I needed them in metric. A lot of the table was designed around using American standard 2x4s and 1/4 Inch pieces, which my hardware store did not carry. So, to get around this, I built the table in Blender, scaling the pieces to Millimetres and figuring out what pieces I had to buy.

The completed render, still with cupholders and dice trays. I eventually went without putting them in, as I preferred the smooth surface, and my group mainly drinks tea anyway; and cupholders do nothing for mugs.

Once the table was built, I took it apart and laid it out so I had a general idea of the size and amount of wood I would need, and made a buylist.

A quick visit to the local hardware store to buy wood and screws...

... and my living room makes for a handy workshop.

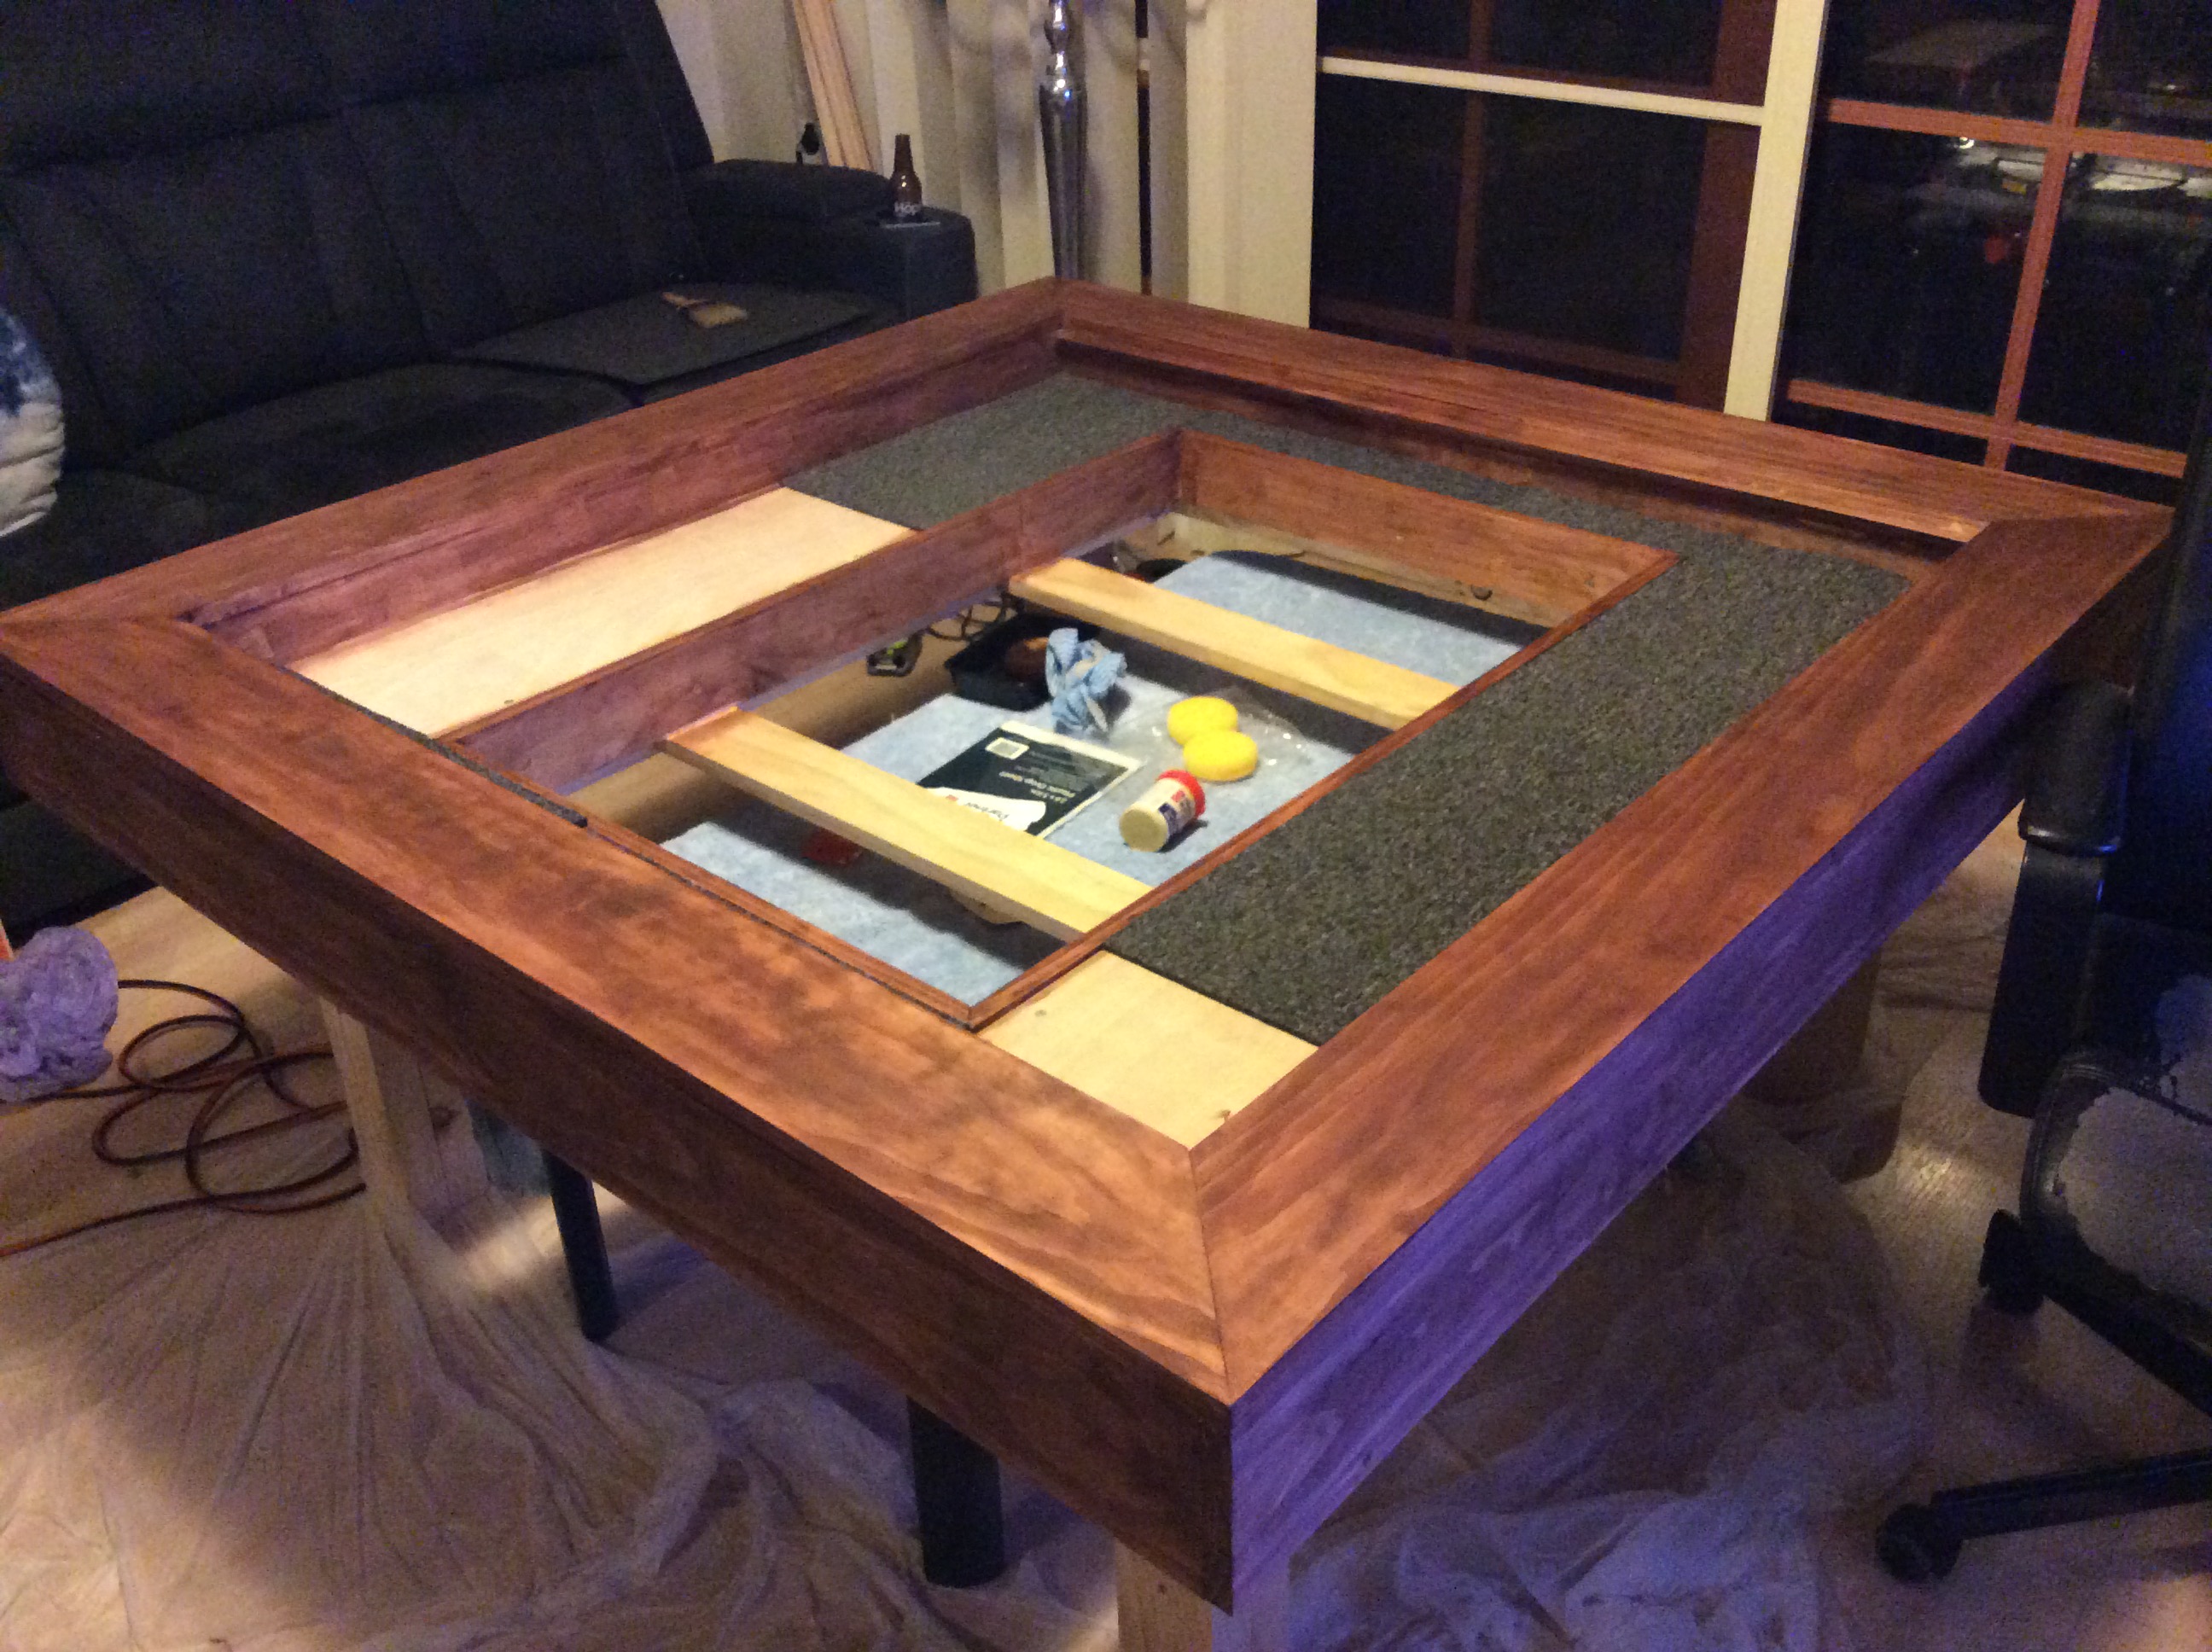
The first step was to make a frame for the TV to hold it into the table. The pieces were measured and bevel cut, then glued and screwed together around the TV to ensure it would fit.

Here you can see how it looks without the TV.

Next the support beams were glued and screwed into the frame to support the TV's weight.

The whole thing is turned upright and put on my coffee-table/workbench.

Here is a perfect example of why to be careful when putting your screws in. I missed the centre of the frame's edge, and it split down the side. I removed the screw and replaced it further in, and thankfully the split went back down.

Here is the entire frame without the TV.

The second step, cutting a hole out of the plywood base for the playing surface. I centred the frame and traced around it with a pencil.

A trick for centering was to draw a line down the middle of both the plywood and the frame, so I could just align the two lines.

It is worth noting, my store didn't carry a 4ft (1.2m) square piece of plywood like the design called for, so I had to make due with two 1220mm x 600mm pieces and keep them held together by screwing into the support beams for the legs/frame later on.

Made the pencil lines more visible for working with the Jigsaw with a red felt tip and cut them outside.

Each piece was cut to fit the frame inside.

Always wear your eye protection kids. The jigsaw blade snapped while cutting the hole. Luckily, it stayed in the wood instead of going flying into something (or someone).

The plywood halves took some work, but they fit around the frame eventually. Because they will be held in by the support beams and are not actually attached to the frame, you can make the hole for the TV Frame bigger than it needs to be to allow it to fit without too much worry; the gap will be covered by the play surface cover.

Third step, the support beams go on. The TV frame is screwed onto these beams, as are the plywood halves, but not quite yet.

At the moment the TV frame is not attached. The Plywood halves are screwed in place.

The TV frame is then raised 5mm to be flush with the playing surface. I accomplished this by leaving it unattached, and having the Frame support beams raised on a carpet square. The frame was then screwed in at this height.

A quick test with the TV inside the frame. You can see the carpet squares that will be the play surface being tested as well.

Fourth step, the secondary support frames go between the leg supports. These are screwed into the main supports, the TV frame, and the plywood halves.

For the Fith step, I turn the table over and raise it 2.5" for the recessed playing surface. The interior rails are put either side to be measured, ready to cut and attach.

The main leg supports do not have to span the entire table top, even in the original design. The interior rails are all attached to the plywood by wood glue and screws.

The Interior rails are glued and screwed, and the table turned over.

The Sixth step, cutting the rail internal supports.

Putting them on with glue. Once they are secured in place, I screw them from the inside in for extra strength.

Gluing takes a long time, and I can't do it all at once as I need to hold them in place.

But eventually they are all in place.

I can't screw the pieces over the interior rails, so instead I use a 90° bracket to secure them in addition to the glue.

The Seventh step, I cut the exterior rails to size...

...and fasten them together with the same 90° brackets to avoid having screws on the corners.

I then lower the entire thing over the table and screw it in place.

For the eighth step, the legs. Each leg is a 90mm by 45mm by 1.2m piece cut in half and a shelf cut out of one of the halves for the leg to sit on the support beams.

Step Nine, drilling the bolt holes for the legs. You can see the bolts I used, which also doubled as makeshift clamps to hold the legs in place while I drilled with a 10mm drill bit.

Each leg is held on by two bolts, then fastened with a spanner. Using bolts allows the legs to be removed in the event that the table needs to be moved around.

Now that the legs are bolted in place, their other halves are attached by gluing and screwing them together.

After letting them dry, the table is finally able to stand on its own legs. It is very solid and doesn't wobble at all, even with the legs in two pieces like this.

The Tenth step involves measuring and preparing the rail toppers for being mitre cut. You can see the support corner round that will go along the side to hold the removable table toppers in place.

Once the rail toppers are cut and put in place, they are fastened with only glue. No screws in them.

Here it is with the topper pieces, which were bought to size from the hardware store. Everything is then sanded through the grits, in preparation for staining.

Staining begins with sponge brushes. While waiting between coats, the carpet squares are cut to size and fitted.
Another angle. The legs are left unstained as I ran out of stain after doing the topper panels. Whoops. I will do them later.

Another angle.

Here it is with the topper panels on.

And now stained.

L-Shaped corner round was used to add a trim to the table, and raise the topper panels. It makes it nice and neat. This trim was left unstained and attached with glue to the support round from earlier.

Once everything was stained and in place, the next step was finishing. The table was sanded between coats with 240 fine grit, and given three coats of gloss finish.

Here is a better look at the finish.

From another angle. The trim does raise the topper panels by about a millimetre higher than the rest of the surface, but there's not really anything I can do about that now.

Here is how it looks finished without the topper panels or carpet.

And it all comes together.

The table was then briefly put on it's side so that caster wheels could be attached to the ends of the legs; and a powerboard screwed onto the support beam for the TV to be plugged into.

And here it is, all ready for the first session into Castle Ravenloft. Throughout the project, only my DM knew I was making the table. The party arrived and sat around, thinking it was just an ordinary table until we removed the panels to reveal the TV. They were excited, to say the least. :P
Minor spoilers for Curse of Strahd and Castle Ravenloft show up on the monitor from here on.

The Table was a huge hit. We used Roll20 for the map software, with the Table showing a fullscreen window of a player's view, while the DM's view was on the laptop screen, for removing fog of war, moving the map around, and such. If you know Roll20, you know how it works.

Custom minis represent!

And one final, nice shot of the whole thing. Building the table was an amazing project, and I'm looking forward to using it more often. :D

Cat tax!
OtterAvalanche
Hey! My group is doing curse of strahd right now too!
TheNameIWantedWasntAvailable
finalstrife07
You should put a layer of glass over the tv. It'll protect the soft plastic of the tv screen from scratches.
acorntail
We have bought a plexiglass screen cover for it, but we've yet to cut it and put it on.
IMayOrMayNotHaveTroubleFindingAndOrChoosingAUsername
Nerd <3 - Well done.
RadioTOKYO
Really nice work. How do you remove the covers?
acorntail
You can push them together and lift by the gap made. I was looking into drilling a hole or stapling a ribbon as alternatives, however.
ImgurPlz
You might want to add actual holders, in case of horrific drop onto glass. ?
voluptuousdebaucheries
I would put glass or something over the screen if you want it to work for a while, otherwise, good job!
Erutanmi
Any chance you’d want to post the Blender file? I’m afraid to start from the ground up but want a template to work on.
chogenes
Build more!! ETSY!!
StapMeVittles
*sigh*I miss playing D&D... and this just makes it more awesome
scoh
running a drop saw in the living room... bold move.
acorntail
Nah, just brought it inside overnight. I was forced to sand inside, however. Lotsa dust, that's for sure.
stevetehpirate
Bigmclargehugegr8
Where was this comment when I decided to level my concrete slab with a grinder! Floor came out great but was cleaning dust for years
aquaxhell7
Very nice work! I'd be just afraid about the screen because it's unprotected and you are not supposed to touch it
LickLickLickMyBalls2
I agree, a piece of plexiglass would go a long way in protection here
gentledruid
He could consider putting the tv on the pill ... or just go classical with some latex ;)
PeteCorrigan
TVs also have a warning not to lay them down for long periods of time... much less turn it on while laying down.
vpuppy
I think that's just for proper heat dissipation. I geuss if it's cold enough it doesn't matter
acorntail
We are getting a perspex panel to protect it, but it still needs to be cut to size.
ImLukeSkywalkerImHereToRescueYou
That was my first question throughout all of this. Thanks for answering! Nice work!
Istherenothingleft
Nice work!! I kept waiting for the screen to be covered
SuperVillainWithAHeartOfGold
This would be insanely crooked and wobbly if I made this
squelcheswetly
Looks awesome. Is the TV swappable if you want to upgrade/replace it?
acorntail
I suppose it would be, so long as the replacement is either the same size or smaller.
Chokehold
Question: how does the DM plug into the TV? Is it a reach-under every time or is there an easy access HDMI port in the table somewhere?
acorntail
It is reach under, but we leave the HDMI cable under there and tucked into the rail, so it is easier to reach.
PeteCorrigan
I just put a projector on the ceiling and pointed it down at the table. Way more efficient, less work, and cost effective.
dairyvet
2×4s arent a standard lumber size where you live? What is then?
acorntail
18mm by 40mm.
dairyvet
Interesting. I would have assumed it was just the metric size for a 2×4, not a 1×2.
donkeykongseitan
You had me at "used Blender". +1
smithdogg22
acorntail
waitdoyounot
It looks amazing. Can I come over and play?
acorntail
With a table like this, you're never hurting for people who want to play. :P
waitdoyounot
ElectroluxType2
OP rolled a natural 20 on this one.
acorntail
After two weeks, I feel I may have taken 20. XD
lockthatdoor
DOPE
peacemaker102
Gosh I wish I had friends to play dnd with. It looks so fun.
ConsumingHate
Don't have anyone to play with either, so I have just been slowly filling a notebook with basic ideas and backstories.
ConsumingHate
To be fair to others though, I can get easily distracted listening to the others at the table and then a little to slow on my own actions.
MarkusZ91
@op definitely planning on making this myself.... could I get a list of dimensions?
acorntail
Imperial or Metric? There's the original video/design, then the one I adjusted for metric.
MarkusZ91
metric since I'm eurotrash xD
acorntail
MarkusZ91
OP I love you <3
BarDown89
I wonder what you could use the TV for other then D&D, anyone know?
acorntail
An arcade style set-up for fighting games has been suggested.
DannyStubbs
My group is in this dungeon right now! I recognize that staircase lol. You're right about his castle being a pain.
prawnklng
What type of wood did you use ? The finished product looks amazing.
acorntail
Regular pine wood, but finished with Jarrah wood stain and gloss lacquer.
prawnklng
How often will it need maintenance to keep it looking this good ?
Phaelanx1337
Really nice!! I saw the same video and was going to make my own table as well! Question: what digital map maker sre you using?
WanderSoul
You can make maps in Dungeon Painter Studio (steam), Astral Tabletop (web), RP Tools (free dl, tricky) @Phaelanx1337
Phaelanx1337
Awesome! Ill check those out. I poked around before but some of the free ones were a bit too finnicky for me. Ty!
acorntail
Map maker, we bought the maps. The map program we used was Roll20, however.
0atmealcreampie
.
TonysAbbs
Nice, but did you get a snag on bread while you were at bunnings?
MonkeyOnATypewriter
Found the Australian
acorntail
Two. :P
Cattrina
Is there a plexiglass protecting the screen? I am SO afraid someone will toss a cup of tea on it...@OP
acorntail
There's one on its way, but I hadn't cut it to size before game night.
Cattrina
good good :)
Junai
I would use a piece of smoke colored plexi. I use it for arcade monitors on my cabinets. Hides the bezel and looks black when not powered on
Junai
You can get them in custom sizes to fit exactly your TV. https://www.estreetplastics.com/1-4-inch-transparent-grey-2064-plexiglass-sheets-s/
Everydayisbbqday
Make sure you got enough ventilation for the monitor. Else it will have a short life. Most monitors aren't built to be mounted flat and 1/2
Everydayisbbqday
2/2 rely on passive thermal ventilation where hot air leaves through the top which draws in cold from the bottom.
shredder826
^^This, I tried this with an old flat screen and it kept overheating and turning off. It wasn’t mounted. Just elevated w/bed risers.
acorntail
Hmm, that's interesting, I didn't think of that. I could mount a fan down there, maybe.
darkconsole
i killed two flat screen monitors laying them flat without forced ducted cooling.
YatekMorah
Two big slow moving fans should do the trick. I am not sure about tv model, but LED ones don't need that much of ventilation in 1st place.
YatekMorah
Also, consider securing power strip or getting waterproof one.
ConsumingHate
Or double up, secure a waterproof one.
Everydayisbbqday
Only needs a little since convection cooling is what it's built for. I'd recommend blowing cool air from the bottom only.
Everydayisbbqday
Radial fans should work best. Finding 230v ones that move slowly or are dimmable might prove difficult but they are out there.
Everydayisbbqday
Or you know whatever comes out of your country's socket. fans made for pc would be cheap but tend to be axial and require a 12v converter.